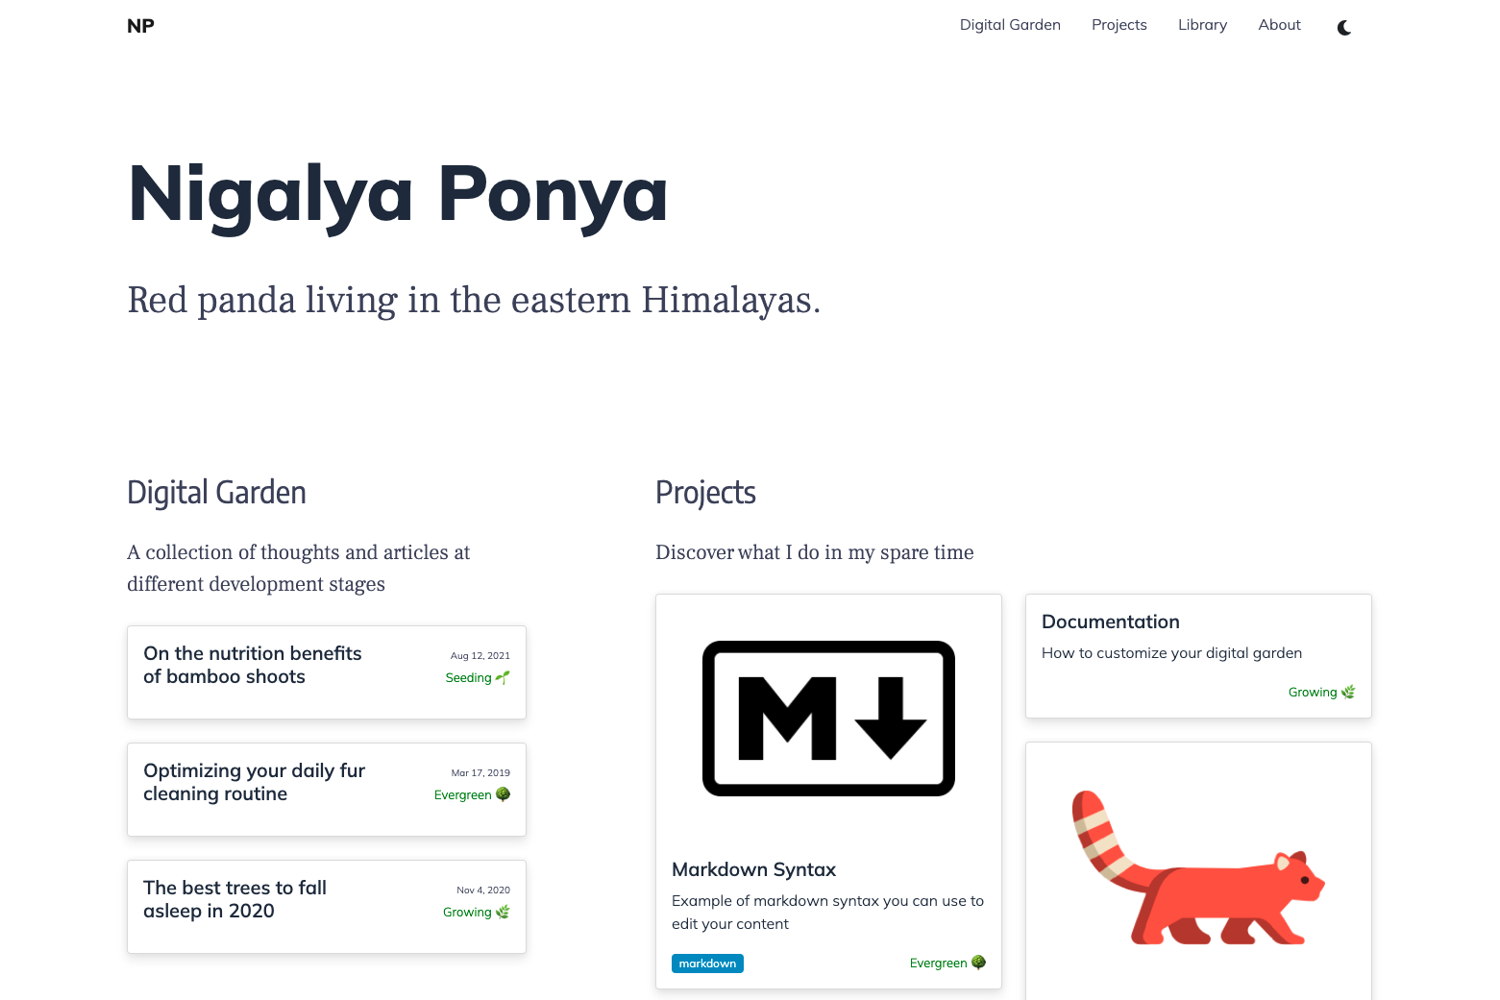
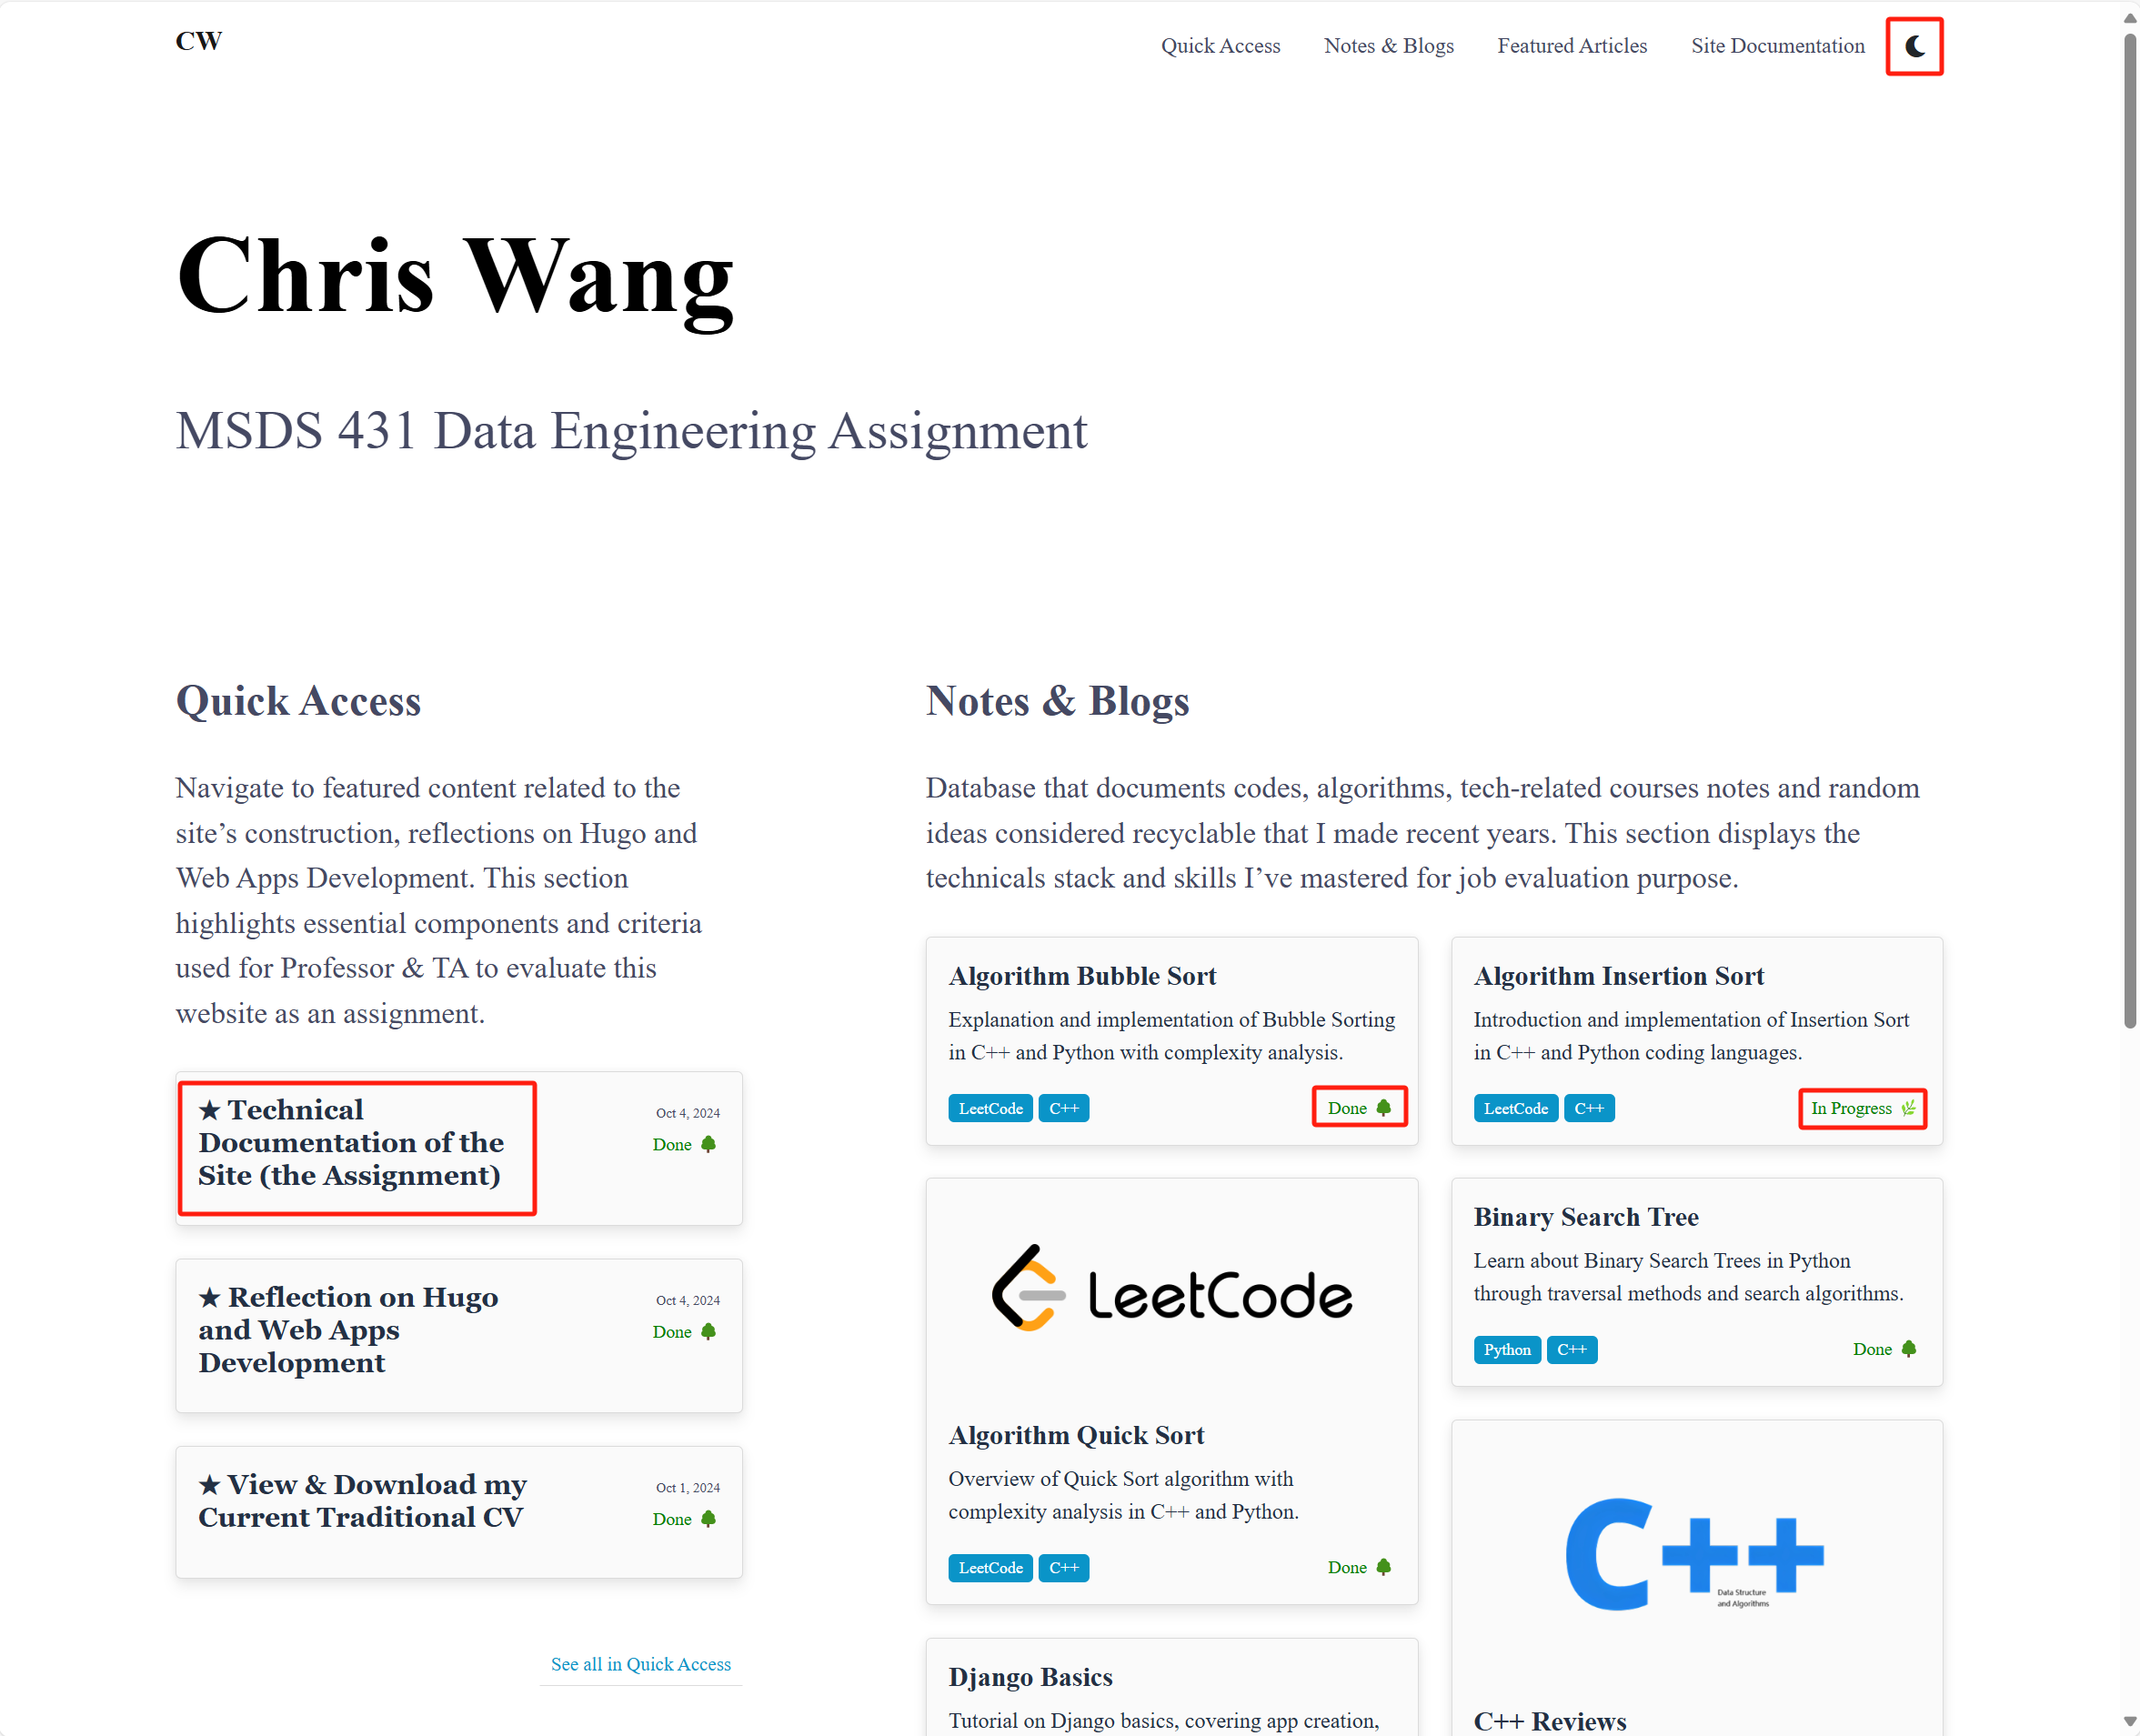
★ Technical Documentation of the Site
Created Oct 1, 2024 - Last updated: Oct 4, 2024
Constructing Hugo Site
Created: September 30, 2024 3:24 PM
Introduction
This article demonstrates how this website is constructed. It documents changes I made on the favored Hugo template and steps I’ve taken to apply these changes.
Hugo Installation on Windows
Install Chocolatey (Package Manager for Windows)
First, install Chocolatey if you don’t have it. This will make it easier to install Hugo.
- Open PowerShell as Administrator.
- Run the following command:
Set-ExecutionPolicy Bypass -Scope Process -Force; [System.Net.ServicePointManager]::SecurityProtocol = [System.Net.ServicePointManager]::SecurityProtocol -bor 3072; iex ((New-Object System.Net.WebClient).DownloadString('https://community.chocolatey.org/install.ps1'))
Install Hugo using Chocolatey
After installing Chocolatey, install Hugo by running the following command in PowerShell as Administrator:
choco install hugo -confirm
Verify Installation
To verify Hugo is installed correctly, run:
hugo version
Alternative Method: Manual Installation
- Go to the Hugo Releases page on GitHub.
- Download the latest
.zipfile for Windows (look forhugo_XX.X_windows_amd64.zip). - Extract the downloaded
.zipfile. - Move the extracted
hugo.exeto a folder that’s included in your system’s PATH, such asC:\Program Files\Hugo\.- To add it to your PATH, right-click on This PC > Properties > Advanced System Settings > Environment Variables, then find and edit the
Pathvariable under System Variables, adding the path to the folder where you placedhugo.exe.
- To add it to your PATH, right-click on This PC > Properties > Advanced System Settings > Environment Variables, then find and edit the
- Open a new terminal and run
hugo versionto verify the installation.
Now you should have Hugo installed and ready to use on your Windows machine! Let me know if you need further help!
Start Using Hugo
This part records my feelings using Hugo, often comparing to Django, a framework I have worked with for 2 years. Note that these are just my hands-on impression of using Hugo, instead of tutorial level introduction of it.
Use a Template
Follow the instruction and connect the project using git to GitHub. GitHub supports free deployment of Hugo project.
Structure of a Hugo Project
content
- Storing textualized markdown files that define the contents of the site.
- Most integrated web framework put these contents in the backend database, while Hugo, being a static webpage generator, involves these files as static files read by the engine utilizing templating syntax.
- The repo structure of the content folder also dictates the URL structure of the site, which I believe, is extremely convenient.
layouts
- Storing html static files. In Django, folder that serves the same function is commonly known as
templatefolder, with static files stored in it as well. Hugo stores static files excluding html in astaticfolder. layouts/partialscommonly involves reusable code chunk that are to be organized by templating syntax using{{ partial "xx.html" . }}. In Django, this is done using{% extend “xx.html” %}, but with remarkable limitation when using comparing to Hugo.
static
- Root level static files that overrides other static files, in
themes.
config.toml
- Overarching configuration file of the project. It overrides
.tomlinthemes.
Constructing Site by Modifying the Template
Before
After
Add a Favicon
- The template I use does not have a Favicon. Even if it does, it doesn’t necessarily suits my content. I created a Favicon using Microsoft Painting and put it under
static/favicon.png. - Go to
layouts/partials.head.htmlwhere involves html header codes and add:
<link rel="icon" type="image/png" href="{{ "favicon.png" | relURL }}">
- The connection is then made and the Favicon is shown.

After
Change Font
- I’m doing a personal showcase that help seeking jobs, so I favor Times New Roman as the major font style of the site.
static/cssstores overridingcssfile. In this template, it is namedmy_style.css. This file is last loaded file that overrides other style. So add customized style:
.subheading {
    font-family: 'Times New Roman', sans-serif;
}

a.heading.fs-2 {
    font-weight: bold;
}

h1 {
    /* font-family: 'Times New Roman', sans-serif; */
    color: black;

}

h2, h3, h4 {
    /* font-family: 'Times New Roman', sans-serif; */
    font-weight: normal;

}

p, li {
    /* font-family: 'Times New Roman', Times, serif; */
    font-weight: normal;
}

code {
    color: red;
    background-color: #f0f0f0;
    padding: 2px 4px;
    border-radius: 4px;
    font-family: 'cascade code', monospace;
}
Customize Font of the Titles in Quick Access to Highlight Contents
- I wish content in Quick Access Section can stand out when my work is reviewed by professor or TA. To change font of certain elements within the templating syntax, like:
...
<div class="row row-cols-1 g-4 mb-5">
{{ range ( where site.RegularPages "Section" "quickaccess" | first 6 ) }}
{{ partial "home_garden.html" . }}
# This is in a loop that repeats itself n times. (n = number of .md files in the folder)
...

# partials/home_garden.html
...
<div class="col-8">
        <h5 class="card-title **quick-access-title**" >{{ .Title }}</h5>
        <!-- <p class="card-text">{{ .Summary }}</p> -->
</div>
...
- Add a new subclass named
quick-access-title. Note that it is not viable to add ID to track the html element, because ID is unique. Each element can only have one ID, while in this case, under templating syntax, this html chunk is repeated multiple times which would create multiple different elements. - Then add in the
my_style.css:
.card-title.quick-access-title {
    font-family: 'Georgia', serif;
}
Other Minor Adjustment
- The original template’s dark mode switch button is set a bit too down. Lift it up a little bit to be aligned with the other navbar elements.
- First I will have to track the element by adding an element ID for the dark mode switcher. This is now viable, because the switcher element is unique. This can be modified in
header.htmlwhich forms the navbar.
<li class="nav-item" **id="dark_mode_button"**>
        <a class="btn fas fa-moon" id="dark-mode-toggle"></a>
</li>
- This is then done by adding in the
my_style.css:
.nav-item {
    margin-top: 0.5rem;
}

#dark_mode_button{
    margin-top: 0.6rem;
}
- Also change the
statuslogic to suit the content.
{{ with .Params.status }}
    {{ if eq "idea" . }}
    <span class="status">Idea 🌱</span>
    {{ else if eq "inprogress" . }}
    <span class="status">In Progress 🌿</span>
    {{ else if eq "done" . }}
    <span class="status">Done 🌳</span>
    {{ else }}
    {{ end }}
{{ end }}
Filling the Constructed Site with My Own Content
About My Own Content
- I do have a database documenting my notes and blogs that can be showcased in this scenario. This is also not the first time I make a personal blog site. My old blog site is constructed using Django Framework. Weeks ago, I tried to apply for a web developer job and recorded a video about my previous works. Links here if you’re interested.
- My personal blog website is shown in the video (0:02:14) in the video bellow.
https://www.youtube.com/watch?v=z33qEeslDec
- This is how my notes look like:
After
Migrate My Notes & Blogs to the Site
- Migrate them to the new site using Hugo’s framework requires adding front matter to these notes. Yes, Hugo’s markdown files’ attributes are normally denoted by front matter. Considering doing this manually can be time-consuming, I wrote a python script to do the job for me.
- The script adds front matter, and form summaries for the content of the file. The summarization is done by accessing ChatGPT utilizing OpenAI API.
# gptconclude.py

import os
import shutil
import yaml
from chatgpt_api import summarize_text

input_folder = r"E:\wdSnapshot1005\BellowAverageSite\BellowAverage.github.io\content\notes"
output_folder = "./temp2"

if not os.path.exists(output_folder):
    os.makedirs(output_folder)

for folder_name in os.listdir(input_folder):
    folder_path = os.path.join(input_folder, folder_name)

    if os.path.isdir(folder_path):

        for file_name in os.listdir(folder_path):
            if file_name.endswith(".md"):
                md_file_path = os.path.join(folder_path, file_name)
                print(f"Processing markdown file: {md_file_path}")

                with open(md_file_path, 'r', encoding='utf-8') as md_file:
                    lines = md_file.readlines()

                if lines[0].strip() == "---":
                    try:

                        frontmatter_end_index = lines[1:].index('---\n') + 2
                        frontmatter_lines = lines[:frontmatter_end_index]
                        content_lines = lines[frontmatter_end_index:]

                        frontmatter = yaml.safe_load("".join(frontmatter_lines[1:-1]))

                        content_text = "".join(content_lines)
                        summary = summarize_text(content_text)
                        print(f"Summary generated: {summary}")

                        frontmatter['summary'] = summary

                        new_frontmatter = "---\n" + yaml.dump(frontmatter) + "---\n"

                        new_content = new_frontmatter + "".join(content_lines)

                        new_folder_path = os.path.join(output_folder, folder_name)
                        os.makedirs(new_folder_path, exist_ok=True)
                        new_md_file_path = os.path.join(new_folder_path, "index.md")

                        with open(new_md_file_path, 'w', encoding='utf-8') as new_md_file:
                            new_md_file.write(new_content)

                        print(f"File written to: {new_md_file_path}")

                    except Exception as e:
                        print(f"Error processing {md_file_path}: {e}")
                else:
                    print(f"No frontmatter found in {md_file_path}")

print("Markdown files processed and summarized.")
- Also how to call ChatGPT API.
# chatgpt_api.py

import openai

def load_config():
    config = {}
    with open('config.txt', 'r') as f:
        for line in f:
            if "=" in line:
                key, value = line.strip().split('=', 1)
                config[key] = value
    return config

def summarize_text(text):
    config = load_config()
    api_key = config.get('API_KEY')
    model = config.get('MODEL')

    openai.api_key = api_key

    response = openai.ChatCompletion.create(
        model=model,
        messages=[
            {"role": "system", "content": "You are a helpful assistant that summarizes markdown content which is to be shown on the card in the webpage serving as a description (preview) of the content. The result should be less than 15 words in no more than 1 sentence. "},
            {"role": "user", "content": text}
        ],
        max_tokens=50
    )

    return response['choices'][0]['message']['content'].strip()

if __name__ == '__main__':

    sample_text = "The content of the markdown file goes here."
    print(summarize_text(sample_text))
- Then move the output folder under
content/notes.
Featured Articles Section
- Featured Articles are basically selected notes from Notes & Blogs section.
Modify Article Viewer
Add a TOC
I honestly don’t quite like the original template’s article viewer. I wish to add a table of content navbar that can navigate to certain part of the article.
- To do so, I went to
layouts/_default/single.html:
<header class="page-header">
    <h1>{{ .Title }}</h1>
    <!-- Other header content-->
</header>

<div class="main-container">
    <aside class="sidebar">
        {{ .TableOfContents }}
    </aside>
    <div class="content">
        {{ .Content | safeHTML }}
    </div>
</div>
- Then go modifying css file:
/* Reset default margins and paddings */
body, html {
    margin: 0;
    padding: 0;
}

/* Page header styling */
.page-header {
    padding: 20px;
    background-color: #f5f5f5; /* Optional: Header background color */
    border-bottom: 1px solid #ddd; /* Optional: Bottom border */
    text-align: center; /* Center-align the title */
}

/* Main container styling */
.main-container {
    display: flex;
    flex-direction: row;
    margin: 0;
    padding: 0;
}

/* Sidebar (TOC) styling */
.sidebar {
    width: 250px;          /* Fixed width for the sidebar */
    flex-shrink: 0;
    padding: 20px;
    background-color: #fafafa; /* Optional: Sidebar background color */
    border-right: 1px solid #ddd; /* Optional: Right border */
}

/* Content area styling */
.content {
    flex-grow: 1;
    padding: 20px;
}

/* Responsive design adjustments */
@media screen and (max-width: 800px) {
    .main-container {
        flex-direction: column;
    }

    .sidebar {
        width: 100%;
        border-right: none;
        border-bottom: 1px solid #ddd;
    }
}
The .md viewer goes from:
Before
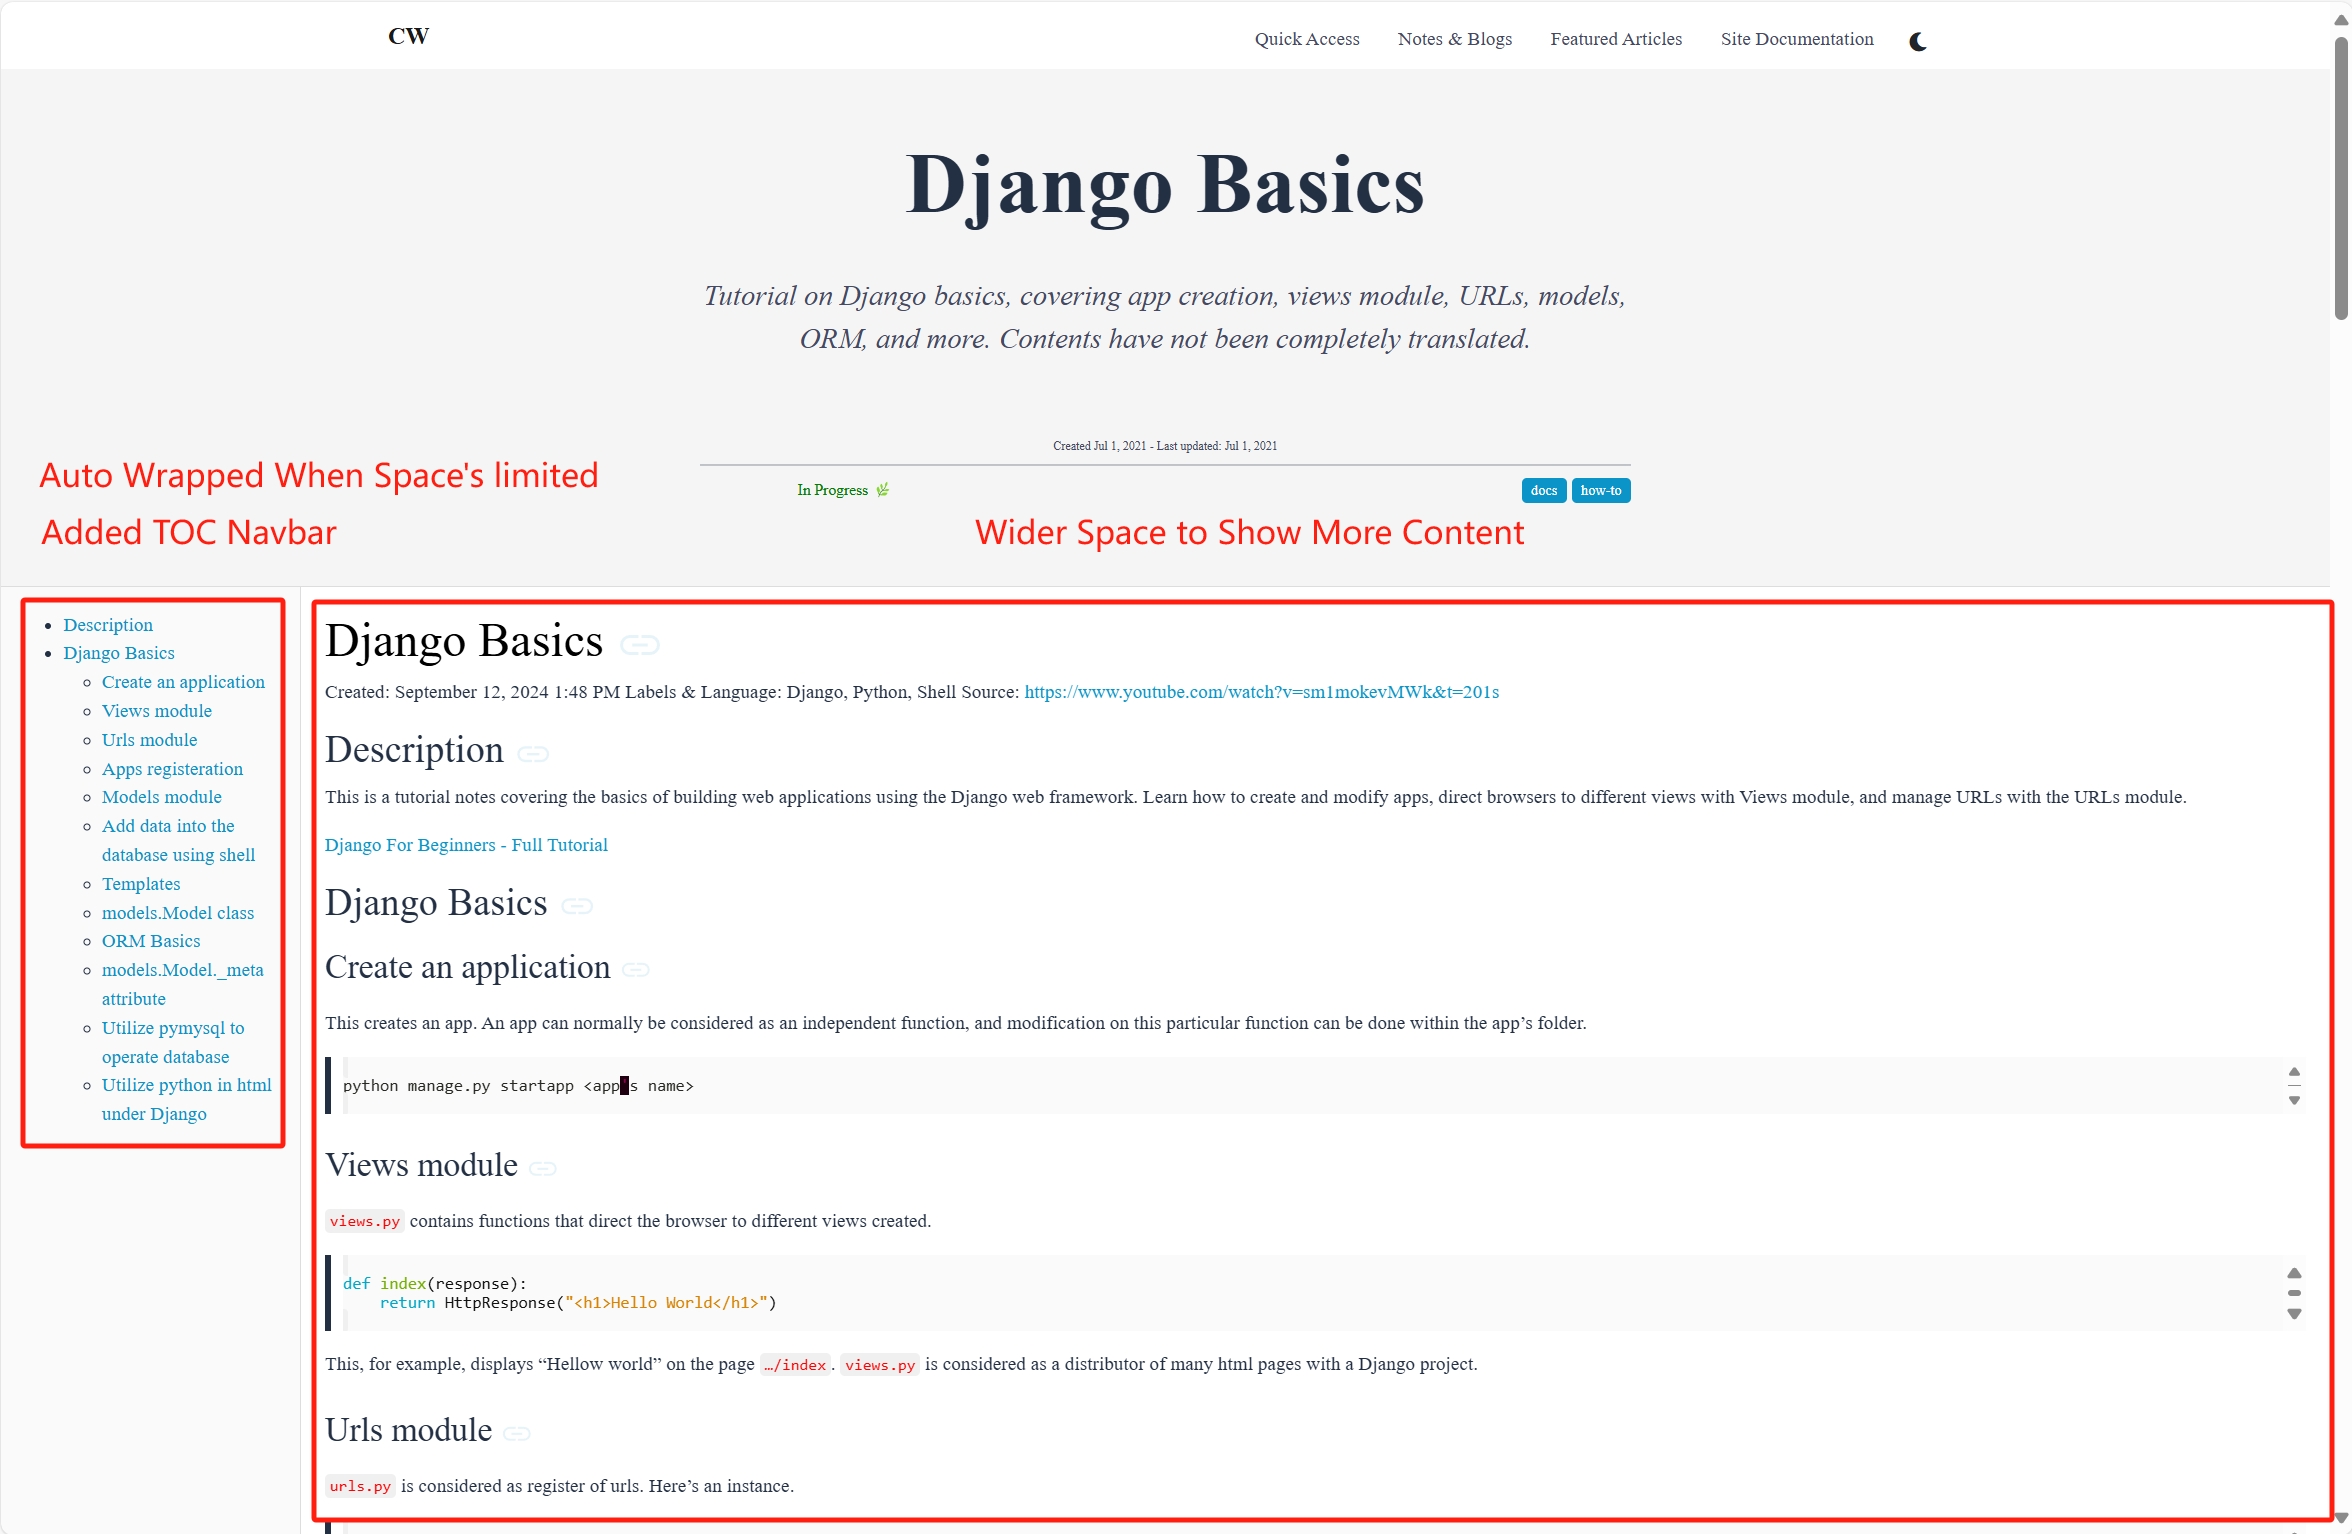
After